Well, a lot has happened since my last post. Here's a quick update:
I got the original flywheel and clutch assembly out of the derelict engine and to a machine shop one county over. They did a great job cleaning and machining the flywheel! When all was said and done, it looked like this:
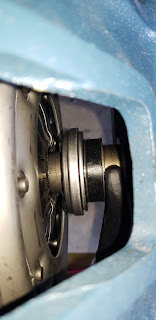
Here you can see that the throwout bearing has enough room to fully disengage from the clutch fingers. When I wedged it into position with the heavy duty clutch, there was no disengagement. Once that was done, there was only one thing left to do...get that transmission! Here it is, hanging off of the alignment pins:
This allows you to fully seat the input shaft of the transmission into the splines of the clutch disk and the pilot bushing that we installed in the back of the crankshaft. Once it is seated, you have to reach from inside the bell housing and install the two bottom bolts. Once those bolts are installed, you remove the pins, one at a time, and replace them with the transmission mounting bolts. Once all four bolts are installed, you can properly torque them. Completely installed, it looked like this:
The plastic bag on the rear of the transmission is to keep bugs and debris from entering into the transmission. After all of that, there was one last thing to add...a small, leather cover for the clutch fork. This keeps road debris from entering into the clutch area. It looked like this:
Now it was time to think about putting this beast into the truck! So I reached out to my truck forum friends for tips, tricks and advice. The response was universal: if you are doing this as an assembly (I plan to) then the front clip has to be removed! Here we go.... It's really not that hard. Just seven bolts on each side of the firewall, two bolts on the radiator support and two support rods from the fenders to the firewall. How hard could it be?
So, after spending close to five hours in awkward positions breaking off and/or grinding rusted in place bolts, the front clip was loose, although I did not remove it. I didn't do that because I don't have any place to store it! Plus, I did make a few discoveries while getting the front clip loose.
Cue the dour music:
They say a picture is worth a thousand words:
This is the passenger side floor where it meets the toeboard/firewall. Here's the driver side:
Now, I knew that there was rot. I did not know just how bad it was. These areas are adjacent to where the front clip joins the cab. Having complete access to these areas will be key to getting these panels replaced. That means...no engine installation any time soon. That milestone is moving to the right.
So, I've got some learning to do. I've got a ton of welding ahead of me! Once I get these panels replaced, then I can think about putting the engine back in. This is not how I wanted it to go, but sometimes you have to go with the flow.
What does it all mean? It means that my work on the truck will take the winter off. I don't have the patch panels and they are expensive. I don't have the room in the garage to get this done right now. So first on the list is to finally build my garden shed. That will allow me to free up some room so that I can work and hopefully not burn down the house. I'm hopeful to build the shed in early spring and move out from there.
So my Gray Ghost Fans, Happy Holidays. I'll see you all in the new year!
Here's one last pic. It shows the stomp starter and linkage installed. I can't wait to try it out!


