The first project that I spent some time on this fall was refurbishing the horn. I figured that I should finish that up, since it's been in the basement for almost 10 years and the wiring harness came with the horn feed and relay included. The bracket had been one of the first things I restored, as it was an easy piece to experiment on with different rust removal techniques. Sadly, I have to report that there was an accidental dropping of the piece while the paint was still tacky, so a part of it got bollixed up and will have to be redone, but all in all it looks ok. Here is a shot of it on the workbench:
The next project is an experiment. I've done some reading up on adding an electric fuel pump to the fuel system. Not in place of the mechanical pump, but in addition to. I bought the parts back in the summer and finally got around to plumbing it into the engine test stand. I haven't finished this task, as I had to move the gas tank to fit the pump into place and I have to figure out where the final tank place will be. For now, the fuel pump looks like this:
You can see the test stand gas tank (from on old Honda lawn mower!) sitting on the garage floor. You can also see the wiring from the pump. The brown/red wire running to the fuse block and the black to the momentary on/off switch and ground.
This shot just shows the connection from the electric fuel pump to the mechanical pump. From what I've read, the pressures are not additive, so it is like having a backup to have them both in line. Right now, it's just wired up for priming the carburetor. If I like how it works out, I'll do the extra work to wire it into the truck to make it work both as a carb primer and as a part of normal operation of the engine.
The next project was sandblasting and priming/painting the sheet metal in front of the radiator. The radiator hold down was first. It is done, but I did not get a pick of it. The next piece is the hood latch that connects to the sheet metal filler panel between the radiator and grill. It cleaned up well and look like this:
Front
Clearly, you can see that one part of it only got primer. I didn't see this until after I reinstalled the latch return spring.
Back
I like the fact that in the front picture, you an clearly see the GM stampings. They were not visible on the part before blasting.
Then, I started the hunt for everything necessary to convert my engine from an automatic transmission to a manual transmission.
During the wiring process, I made the decision to use a modern, 4 wire ignition switch instead of the original 3 wire switch. This lead me down the path of switching from the stomp starter, with only 1 electrical connection to the solenoid based starter with 3 connection points. The solenoid starter is currently wired up to the test stand and works, so it was an easy decision, even though I really like the stomp starter. Maybe down the road I'll make the switch to a 12V stomp starter, but for now I just want to get it running.
Once I made the decision to go with the 12V solenoid starter, I had to get a new flywheel. The ring gear tooth count is different between the 6V and 12V flywheels. I found one on eBay that looked like it could clean up ok. It looked like this when I got it:
I found a machinist locally and had him hot tank it and grind the surface. When it was done, it basically looked like new:
clutch facing side
engine block facing side
(note the timing BB at the 10 o'clock position of flywheel)
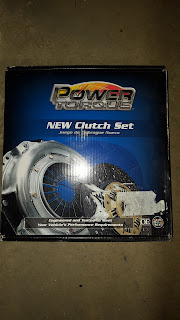
Next on the list was a new clutch. After some research and forum board discussion, I settled on one from O'Reilly Auto Parts. It looks like this:
Here you can see that it is a complete set, including a new pressure plate, friction disk, throwout bearing, pilot bushing and alignment tool. Prior to actually buying it, I took the flywheel up to the local store and had them test fit it on the actual flywheel, just to make sure.
Next it was on to the clutch housing (gm term) or the bell housing as most people know it. Once again, I turned to eBay and scored one that looked like it was in good shape. Dirty, but restorable. Here's what it looked like when I got it:
With a quick trip back to my machinist and a hot tanking of the parts, it was off to the sandblaster to deal with the flash rust that formed after degreasing in the hot tank. Once I had blasted the bellhousing, I primed and painted it with high temp engine paint. The color that I chose was Old Chevy Blue. Now, this is not the correct color for a truck bellhousing. However, it is the correct color for the engine, since it came out of a passenger car. Truck engines were painted gray, while passenger car engines were painted blue. Long ago, I had made the decision to celebrate the engine's history, not hide it. So Old Chevy Blue it was. It now looks like this:
The clutch fork was dipped in Evap-O-Rust, which really ate the flash rust! After derusting, it too was primed and painted. Although this part was painted semi-gloss black and looks like this:
In the Evap-O-Rust
Cleaned, primed and painted
(This view shows the clip that holds it to the stud inside the bellhousing)
Then came the bolts...to hold the flywheel to the crankshaft and to hold the pressure plate to the flywheel. They look like this:
Flywheel to crankshaft
(Box shows both GM group and part #)
Pressure plate to flywheel
At this point, all I'm missing are the rear motor mounts that attach to either side of the bell housing and the bolts to hold them in place. Once I get them, I'll have everything necessary to do the engine swap! I still have some engine work to do to get it ready for the swap. I hope to do that work over the winter, so that by spring...it'll be time to do the swap and make this truck move under it's own power. Cross your fingers, toes, eyes and anything else that will cross!


