1953 chevy truck ad

1953 chevy truck ad

Thursday, November 14, 2019

Moving the Schedule to the Right

Hello Gray Ghost Fans!

Well, a lot has happened since my last post.  Here's a quick update:

I got the original flywheel and clutch assembly out of the derelict engine and to a machine shop one county over.  They did a great job cleaning and machining the flywheel!  When all was said and done, it looked like this:


The overall diameter of this flywheel is exactly the same as the heavy duty one that would not work in my truck.  The difference between them is where the six clutch attachment bolt holes are located.  In this pic, you can see that they are very close to the friction area.  This allows for the use of the smaller 9" clutch.  That is a full inch smaller than the heavy duty clutch and allows for the clutch fork to properly fit in the bellhousing.  The clutch fork installed looked like this:


Here you can see that the throwout bearing has enough room to fully disengage from the clutch fingers.  When I wedged it into position with the heavy duty clutch, there was no disengagement.  Once that was done, there was only one thing left to do...get that transmission!  Here it is, hanging off of the alignment pins:


This allows you to fully seat the input shaft of the transmission into the splines of the clutch disk and the pilot bushing that we installed in the back of the crankshaft.  Once it is seated, you have to reach from inside the bell housing and install the two bottom bolts.  Once those bolts are installed, you remove the pins, one at a time, and replace them with the transmission mounting bolts.  Once all four bolts are installed, you can properly torque them.  Completely installed, it looked like this:


The plastic bag on the rear of the transmission is to keep bugs and debris from entering into the transmission.  After all of that, there was one last thing to add...a small, leather cover for the clutch fork. This keeps road debris from entering into the clutch area.  It looked like this:


Now it was time to think about putting this beast into the truck!  So I reached out to my truck forum friends for tips, tricks and advice.  The response was universal:  if you are doing this as an assembly (I plan to) then the front clip has to be removed!  Here we go....  It's really not that hard.  Just seven bolts on each side of the firewall, two bolts on the radiator support and two support rods from the fenders to the firewall.  How hard could it be?

So, after spending close to five hours in awkward positions breaking off and/or grinding rusted in place bolts, the front clip was loose, although I did not remove it.  I didn't do that because I don't have any place to store it!  Plus, I did make a few discoveries while getting the front clip loose.

Cue the dour music:

They say a picture is worth a thousand words:


This is the passenger side floor where it meets the toeboard/firewall.  Here's the driver side:


Now, I knew that there was rot.  I did not know just how bad it was.  These areas are adjacent to where the front clip joins the cab.  Having complete access to these areas will be key to getting these panels replaced.  That means...no engine installation any time soon.  That milestone is moving to the right.

So, I've got some learning to do.  I've got a ton of welding ahead of me!  Once I get these panels replaced, then I can think about putting the engine back in.  This is not how I wanted it to go, but sometimes you have to go with the flow.

What does it all mean?  It means that my work on the truck will take the winter off.  I don't have the patch panels and they are expensive.  I don't have the room in the garage to get this done right now.  So first on the list is to finally build my garden shed.  That will allow me to free up some room so that I can work and hopefully not burn down the house.  I'm hopeful to build the shed in early spring and move out from there.

So my Gray Ghost Fans, Happy Holidays.  I'll see you all in the new year!

Here's one last pic.  It shows the stomp starter and linkage installed.  I can't wait to try it out!


Sunday, October 27, 2019

No Battle Plan Survives First Contact With The Enemy...

Hello Gray Ghost Fans!

Well, the subject line is a clue to something being amiss.

As I closed the last post, I made the statement that I was one good day in the garage away from being ready to transplant that engine into the Gray Ghost.  I took a mental health day last Thursday to have that day.  So I retrieved the clutch kit that I had bought many months ago and set about installing it onto that beautiful flywheel.  It proved to be a bit fiddly, mostly because of the engine sitting low on the engine stand and the reduced hand/forearm strength from the RA.  Regardless of the cause, I quickly figured out that lifting it into position with one hand and screwing in a bolt with the other wasn't going to work.  What to do?  Build bracing (stacked pieces of wood) to raise it up until it was at the right height.  When finished, it looked like this:


What I would do is lift with one hand and shove another board under the clutch cover with another.  Once it was at the right height, I got the top bolt installed.  After that, I had to rotate the engine to bring each bolt into view.  I chose to attach the bolts at the bottom, not the top, as the access is easier from the bottom.  When done, it all looked like this:


In this shot, you can see the alignment tool in the center of the pic.  This plastic tool engages the splines of the friction disk and holds it in place while you bolt up the clutch cover.  The alignment tool goes into the pilot bushing, which is how it holds everything in place.

After installing all of the clutch parts, it was time to move onto the clutch throwout fork.  This was first contact with the enemy.  In the above pic, above the cast number "10" you can see a round something.  This is the back side of the screw in stud that the throwout fork snaps into.  The throwout fork looks like this:


The end on the left is where the fork attaches to the linkage that connects it to the clutch pedal.  The round area on the right is what snaps onto the stud.  It bows in the middle, under the part number that is cast into the part.  To install the fork, you slide it through the large opening in the center of the bell housing and through a slot on the driver's side of the bell housing.  When I did this, it became clear that there wasn't enough clearance for the clutch fork to fit between the clutch cover and the stud.  Wiggle, wiggle, wiggle, no.  Try from the other side, no.  Try to rotate it, no.  Nothing.  By this point, I've been out there for hours and nothing is working.  Time to take a break and reach out to my forum buddies.

I got a couple of suggestions, but nothing concrete.  In the interim, I decided to measure the thickness of the flywheel that was just mounted in the replacement engine and compare it to the thickness of the one in the dead engine.  Come to find out, the heavy duty flywheel that I was so proud of was a 1/2" thicker that the one in the dead engine.  So then, I decided to see how much clearance that engine had between the stud and clutch cover.  Lo and behold, about a 1/2" more than the replacement engine.  Viewing inside the inspection covers of both engines looked like this:

Dead engine clearance


Replacement engine clearance

While discussing this with my friends, I came up with the idea of removing 5 of the 6 bolts that hold the clutch cover in place and loosening the 6th bolt, while positioning it at the 12:00 position.  This would allow me to swing the clutch cover to the passenger side while trying to snap the clutch fork into position.  I set it up...and it worked!  I then reattached the 5 bolts.  Then it was time to test fit the throwout bearing...and it doesn't fit into the clutch fork.  Not without pressing it hard against the fingers of the clutch cover.  Time to go back to the forum and ask for advice.  Can the throwout bearing ride against the clutch cover fingers or not.  The answer came back:  No!  Game, set and match.  It all has to go.

So now, I have to remove the clutch kit entirely (and try to return).  Then I have to remove the heavy duty flywheel (and try to sell it).  Then it's off to the old engine.

Once I'm done with the replacement engine, I will have to remove the old clutch and flywheel from the dead engine and inspect that flywheel for possible re-use on the replacement engine.  If it is in good enough condition to be re-used, I'll have to have it resurfaced.  Then I have a decision to make:  stick with the 6V ring gear or buy a 12V ring gear and swap it out.

The difference between the two is that the 6V ring gear has 132 teeth to the gear and only works with a 6V starter.  The 12V ring gear has 168 teeth and only works with 12V starters.  They are intentionally not interchangeable.  I can use the 6V starter with my 12V truck.  It'll spin faster, but engage harder than usual, so the ring gear will get a beating.  The unknown right now, is whether or not the old starter in the dead engine still works.  Once I get the flywheel out of the dead engine, I'll hook up the jumper cables and see if the old starter will work.  If it does, then I'll probably stick with that.  If not, then I'll have to buy a replacement ring gear and swap it out.  To do that, you have to heat the ring gear enough to make it swell, so that it can be knocked off of the flywheel.  Then you heat the replacement enough that it can be fit to the flywheel and can cool and shrink to a tight fit.

So that's it.  One step forward, two steps back.  It's all a part of my learning process.  Hopefully, all it costs me is time and not too much money.  What it does do, though, is keep me from installing the engine right away.  The fall is slipping away from me and the cold weather will be here soon.  Once that happens, if the engine isn't in the truck, it probably won't go in until spring.

Stay tuned, I'll keep you up to date.

Here's a somewhat random, certainly unrelated pic.


Who knew deer could climb stairs, just to go after the pumpkins on your porch?!?  Who knew that they could get down?!?  And yes, the pumpkins ended up in the front yard with parts missing and eaten.

Sunday, October 6, 2019

The Transformation Begins!

Hello Gray Ghost Fans!

I've got exciting news!  It's day 3 of my weekend!  While that is great news, it's not what I'm writing about!  Although, it is what got me the extra time in the garage.  How did I use this extra time?  Starting the transformation of the engine from one that drove an automatic transmission to one that will power a manual transmission!  I've talked about it a lot, and now I'm finally getting to it.  Where did this road begin?  Here:


The engine, as it sat in the 1961 Impala in the local junkyard.


"Surgically" removed from the Impala and strapped down in my 93 Chevy truck.


On a cradle in the garage.


Turning the cradle into a run stand.


Run stand completed.


Fan from a Honda Civic, salvaged from the same junkyard.  Now the test stand is complete.


Time passes...other things get done...life goes on...


A pop quiz is added to the blog (see last post for quiz) and the pilot bushing is added to the crankshaft.  Spoiler!


The starter is removed.


Automatic transmission flexplate and adapter plate before removal.


Flexplate gone.

Adapter plate gone...


Restored bell housing installed!
(GM calls it the clutch housing)


Refinished flywheel ready for installation.


Rear of flywheel showing timing BB painted white and layout of firing order next to ring gear.


New motor mounts installed, although only hand tightened right now.

Quite a transformation, I must say.  However, only cosmetic to this point.  I was concerned that the flywheel wouldn't fit under the clutch housing, while the engine was on the stand.  I was correct.  Once I figured out that it wouldn't fit without lifting the engine in the rear, I was too tired and it was too late in the day to continue.  So I called it a day.  Next time, I'll torque down the rear motor mounts shown above and use them as a hoisting point to raise the rear of the engine a bit.  I don't need much room, maybe 2 inches...then I'll be able to maneuver the flywheel into place and be able to bolt it down.  Once the flywheel is in place, I'll remount the starter and reconnect those electrical connections that I figured out in my last post.  From there, I'll add the new clutch assembly and reinstall the transmission.  Once that is done...it's time for that engine to go into the truck!  I'm literally one good garage session away from being ready to install the engine in the truck!

It's been a long time coming.  That first picture above was taken in August 2010.  Yes, I know what you're thinking.  This guy moves about as fast as pond water.  You may be right!  But when I really work at it, I can make some progress.  In fact, it's all the off topic work that makes these work sessions go so fast.  Examples are documented in earlier (sometimes much earlier) posts, where I talk about getting the clutch housing hot tanked and then doing the painting myself or getting the heavy duty flywheel in an auction and finding a 90 year old machinist that would resurface it for me.  All of those things were done, literally, years ago and the finished products were stored in my basement.  All of them waiting for the day.  Today.

I'll get another 3 day weekend in two weeks.  Apart from the joy of having a 3 day weekend, I'll likely get some time to raise up the rear of the engine and get that flywheel installed.  From there, it's just a hop, skip and a jump to engine transplant day!  Wish me luck!

Friday, October 4, 2019

The Heat Finally Breaks...Time To Get Into The Garage.

Hello Gray Ghost Fans!

It's been a long hot summer, but the heat has finally broken!  I had a day off, so with some good temps, it was time to head into the garage!  Now, in the spirit of full disclosure, I haven't taken the whole summer off.  In fact, I was cleaning and prepping the engine bay for when it was time to transplant that replacement engine.  I was actually really happy with just how clean it came.  Turns out that all that oily crud is really good at preserving metal!  Who knew?  Sadly, though, not all of the metal was covered.  So there is some rust and although it looks like a lot of rust, it's really not that bad.  Here are a couple of pics to show what I'm talking about:


To the left of each pic is the radiator support frame.  Next to that is the front engine mount crossmember.  Next to that, you can see the front axle and drag link.  Here's a shot that I thought was funny:


Nothing like having complete access with the engine gone!  I may have published this pic before...but it does show how I went about the business of getting everything cleaned.  It also shows the reality of doing this kind of work without the benefit of a garden shed.  Hopefully, I can remedy that situation next spring!  Anyway, back to the garage.

So, yes, I did have some activity this summer.  Just not as much as I would have liked.  Today, I would change that.  First order of business was to fire up the 235 and make sure that there weren't any hidden failures.  After making room in the garage, connecting the battery and adding some gas, off we went.  She smoked pretty good until it warmed up.  Seemed fine after that.  Good news, she's still a runner!  Second order of business, swap out the original solenoid based starter for an old foot stomp starter!  I just happened to have one laying around, so off I went.  The swap was easy.  The old one was a gnarly mess, as I wasn't ever able to clean it due to it's close proximity to the engine block.  Now it was off and set aside.  Bolting up the stomp starter was equally easy.  Now comes the hard part.  Taking 4 wires from the starter switch and figuring out which ones I need and where they go on a switch that only has 2 terminals.  After some head scratching, I thought I had it.  Hook up the battery, turn the key to the on position, reach down and push on the starter button and it tries to fire!  It actually startled me, which caused me to let go.  No problem, I'll just try again.  Reach down and push the button and nothing.  Check the keys, switch, wires, battery charge all to no avail.  It won't make a single sound.  Well that sucks!  Now what?  Time to clean the old solenoid based starter.  At least that one works.  So I did and then reversed everything that I had just done.  Good grief.

Yes, one step forward and one step backward, but maybe I can salvage something from this disappointment.  Even though the solenoid based starter would start the engine, I knew that something was wrong, because it would shoot out a large spark every time I turned the key to activate it.  Kinda looked like arc welding....  Also, the engine was hard to start.  Meaning that it would have to crank a bunch before it would light off.  I had been told some time ago that if I had an "internally resisted" coil, it would be a problem with starting.  For whatever reason, I never got around to checking.  Then one day this summer I decided to check.  Guess what I found:


No external resistor required.  Engineering talk for internally resisted.  Clear as day, you can also see it is a 12V coil.  So...if it is a 12V coil, why would you need a resistor???  Because GM never changed the points and condenser.  They still operated at 6V!  It wasn't until the advent of HEI ignition systems that we got true 12V ignition!  So, armed with this knowledge, it was off to the flaps to get a coil that needs a ballast resistor, which means that it does not have an internal resistor.  Of course, I would also need a ballast resistor.

How this all works:  When the current flows from the ignition switch, it will flow to the ballast resistor, which will lower it from 12V to 6V, thus preserving the points and condenser.  To overcome the hard starting issue, there is a bypass circuit from the starter solenoid directly to the coil.  This bypass circuit provides true 12V to make starting easier.  Since it is for a short duration, it does not damage the points or condenser.  Once you let go of the key, the bypass circuit is shut off and the engine runs off the ballast resistor and 6V.  The rest of the truck's electric needs are for 12V and are met through a different circuit that runs from the ignition switch through the accessory leg.  Plain as day, right?

To preserve my day in the garage, I decided to wire up the new coil and ballast resistor while the engine was on the test stand and see if it would work.  Logically, it wasn't too hard to figure out which wires went where, so it was off to the races.  With everything wired up, it was time to test it all out.  Let me just say that the results were stunning.  The engine fired up in less that one second!  I'll repeat that:  less that one second of cranking!  Clearly, problem solved.  In case you are wondering, there is no embellishment here.  From there, I let it run until I drained the small gas tank (salvaged from an old Honda lawn mower, but that's a different story for a different day, unless I already covered it way back in the beginning of the blog....)

So there you have it.  Progress, even if it wasn't what I was planning/hoping for.  Decisions that fell out from the day's efforts:  sticking with the solenoid starter, adding the externally resisted coil and ballast resistor and sticking with the one wire alternator.  I now know exactly how to wire them up and the wire harness that I installed some time ago is set up for all of it.

With the cooler weather and progress in the garage today, I am energized to make the last preparations for getting the engine ready for transplant.  Stay tuned....

OBTW, one other thing did get done and I completely forgot about it!  I installed the first piece of equipment necessary to transform the engine from an automatic transmission to one with a manual.  I'll show you all the pic and see who knows what it is.  Here you go:


I'll give you a clue:  I'm referring to the bright, bronze piece in the center of the pic.  The tip of the transmission input shaft rides inside it.


Sunday, June 9, 2019

A Little Cleaning Goes A Long Way!

Hello Gray Ghost Fans!

It's been a while since my last post...you know the one.  The epic "take your engine out of your truck" post.  It looked like this:


Epic, I tell you!  However, upon closer examination, you may notice a wee little bit of grease and grime in that pic.  Not to mention a wee bit more on that transmission I took out.  It looked like this:


So, with the engine removed and the space free and clear, I did what any other sane truck owner would do:  I climbed inside the engine bay!


What a perfect way to access all of the nooks and crannies that need a good cleaning!  I brought along my go to cleaners, some disposable gloves and a roll of paper towels.  For the really nasty stuff, I also brought along my scraper, a flat bladed screwdriver as a precise scraper and a wire brush.  Having at it looks like this:


No, I'm not working that hard, but I am making a somewhat disgusted facial expression...!  Working on the firewall turned out to be quite rewarding.  Under that layer of crud was near perfect paint!  As I got lower, towards the toeboard area, there are some spots where there is rust and/or missing paint.  But the area directly below the hood is near pristine.

In the front of the engine bay is the crossmember that the radiator support and front motor mount bolt to.  After removing the engine, that crossmember looks like this:


To the right, you can see the area covered by the motor mount.  It masked the crossmember from the oil and mud.  The area between the radiator support and motor mount area wasn't so lucky....  It had a solid 2 inches deep layer of oily, coolant soaked crud in it.  This area also got pretty rusty.  At this time, I do not know if that's going to be a problem or not.  I'm not quite done clearing the rust out, so I don't know if the structural integrity was damaged or not.  Here's hoping that it is still ok!

The frame rails were also covered in a layer of crud.  They looked like this:

Driver's side


Passenger side

All in all, this is a ton of work.  To do it, in such a way as to not make a huge mess, means going slowly and deliberately.  That means it's going to take me a while, which means the refitting of the replacement engine will have to wait.  That means getting the replacement engine into the truck will also have to wait.  However, this is too important of an opportunity to pass up.  Getting the engine bay cleaned is important to me.  So off I go, back to my old friends Super Clean and Formula 409.  Once it is all clean, I plan to use that awesome Rustoleum rust converter primer and their industrial flat black paint on the exposed parts in the front.  I'll likely do some spot priming and painting on those areas on the firewall that need some help.  I'll post pics when it is all done.  So for now, enjoy that summer!

Saturday, April 27, 2019

The Big Day Finally Arrives!

Hello Gray Ghost Fans!

It has been a while.  Much longer, in fact, than I thought it would be.  As usual, I've got a reason.  It may not be a good reason, but it's a reason just the same.  So, as I mentioned in my last post, I was prepping for the big day...engine removal day!  Before I got there, I wanted to get the transmission out.  My logic here was that I wanted to prep the replacement engine and have it ready for the day that I did the old engine removal.  My naivete had me believing that I could get the old one out and at least install the new one on the same day.  Of course, I'd need a couple of days to make all the connections, add fluids, etc to make the engine move the truck, but just one day to swap engines.... (This literary and film fans is what's known as foreshadowing.)  Anyway, back to the transmission removal.

So on one of my days off, I took the page from the 1953 shop manual and headed out to the garage.  I'd already done some cleaning of the torque tube, knowing that the shop manual instructs you to unbolt the transmission collar and slide it to the rear of the space provided.  The cleaned up tube with the collar unbolted looked like this:


In this shot you can see the torque tube, collar, universal ball and transmission cross member.  Also, a 2x4 block on the floor jack to support it, since it is under tension from the suspension.  Next, I needed to slide the universal ball backward, exposing the universal joint.  Then, you unbolt the universal joint and slide the internal workings as far backward as possible.  So far, so good.  I was a bit uneasy about being under the torque tube as it will crash to the floor if the bracing failed.  It would have enough force to do bodily harm...or worse.  So I worked slowly and carefully and got the universal joint unbolted and the internals moved backward.  Next, you need to jack up the torque tube until it touches the underside of the cab floor and insert a 2x4 cut to fit between the frame rails.  Then you can safely lower the torque tube until it rests on the 2x4.  All of that I accomplished.  Things are going along swimmingly.  At this point, it's time to turn my attention to the transmission.

In preparation for doing this work, I had to make an old tool that the shop manual calls out.  In reality, it's nothing more than some modified bolts.  So, once I figured out the right size bolt, it was off to the home store and then to the work bench.  The bolts started like this:


And ended up looking like this:


What you end up doing is removing the top two bolts that hold the transmission to the bellhousing and screwing in the modified bolts.  They act as pins that the transmission hangs off while you remove the two bottom bolts.  So, armed with my rendition of a 1953 Chevy tool, it was back under the truck.  Bolt #1 out, pin #1 in: bolt #2 out, pin #2 in.  It seems to be working rather well.

Now that the transmission is hanging by the two pins, it's time to slide it backward, off of the pins, past the end of the torque tube that is propped up by the 2x4 and out from under the truck.  But wait.  It weighs 60-70 lbs.  I can't just lay on my back and "bench press" my transmission.  What to do?  I know, I have an old floor jack that had a slow leak, so I couldn't really use it to jack things up.  I'll buy a transmission adapter and modify the floor jack to be a transmission jack.  Off to eBay!

Time passes and my adapter arrives.  Well, apparently, I didn't quite understand how these things work and it wasn't really meant for my kind of floor jack.  So time for some backyard mechanic engineering.  I ended up having to modify the transmission adapter and add hardware (nuts and bolts) to make it fit.  Some of the pics showing the process follow:


The original floor jack part that holds whatever you are jacking up...


The amount of the mounting tube from the transmission adapter that I had to cut off to make it sit flush in the floor jack.


Inside the transmission adapter showing the bolt that holds it to the floor jack.


Side view of the floor jack after adding the transmission jack adapter.


Full view of the floor jack after modification.

Almost looks like I knew what I was doing!  Enough gloating, time to get back under the truck!

So, I'm back under the truck, I've got my handy dandy transmission jack and I'm ready to get that mother out of there!  I raise the jack to meet the transmission and immediately realize that I'll need some wood blocks to help with the odd shape of the transmission.  Back out from under the truck and over to the scrap bucket.  Got it, now back under the truck.  Blocks in place, safety chain in place, transmission properly supported, it's time to slide it backward...BONK!  Bonk?!?  What the heck is bonk?

Bonk is the sound the transmission makes when it impacts the torque tube.

I know what you're thinking.  You raised the torque tube up and supported it with the dreaded 2x4.  Bonk is not something that we should hear!  Sadly, bonk is what we heard.  So, back into the bellhousing it goes.  Now, I'm laying on my back, hanging shop light lighting the space under the truck and staring at the torque tube.  Time passes with no illuminating thoughts.  Time to try again, because honestly, you probably just screwed it up, noob.  Back it goes...and...BONK!  Crap!  Forward it goes.  This sucks.  I know, let's try to raise the torque tube back up the the cab floor.  Remember when we lowered it to the 2x4?  Maybe we should have gotten the transmission out before lowering it?  Worth a try.  So back to the floor jack, up goes the torque tube, back goes the transmission and...wait for it...BONK!  WTFO?  It's not supposed to be this way.  Things were going so well!  Ok, time to put it back forward.  Umm, what's happening?  It won't go forward anymore!  Did the end get spun around so that the input shaft does not align with the clutch disk anymore?!?  Oh no!  I can't go forward and I can't go backward!  I know, I'll try to spin the universal on purpose, maybe I can get them aligned again.  Well, after several minutes of trying, I had to call "no joy" on that mission.  Good grief!  It (the transmission) is literally stuck halfway in and halfway out.  That's it, I'm wiped out and time for calling it a day.  (For clarity sake, the preceding was also spread over many days of work in the garage.)

Now I'm worried and after much thought I decided that the only thing to do was to support the transmission with the jack while I removed or at least moved forward the engine so that the input shaft would clear the bellhousing.  So here it is, stuck and real life takes a priority.  Knowing that I'd be tied up for several weekends, I decided to add another 2x4 brace under the transmission to support the rear of it, while the input shaft supported the front and walked away for family time.  Don't get me wrong, even though I was always thinking about the situation, my family will always come first.  Always.  So time passed (this all started in February).  March came and went.  Then on to April.  False start.  False start again.  Loads of rain on a Friday night.  Youth soccer is cancelled on Saturday.  It's sunny and pleasant outside.  Time to get it on!

After an abortive attempt to lift the engine, with the truck still in the garage, in the beginning of the month (I left that part out above) I knew the truck had to come out for this to work.  So, early that Saturday morning, I got everything out of the garage and got the truck down off of her jack stands.  She had been lifted up on them for over 2 years!  With my Wife behind the wheel and my Son helping me push we backed her out of the garage.  Now, my wife had some nerves about doing this, since dear old me did the brake rebuild!  I would say trust but verify, but we'll stick with just verify.  Anyway, the brakes worked perfectly!  We eased her into the driveway and onto home built chock/stands to lift her about 3" and chock the wheels so it wouldn't roll over me.

Unbolting the motor mount bolts was not difficult.  Neither was attaching the engine load leveler to the hoist and engine.  Time to lift!  Pump the handle on the engine hoist and up she goes.  Up, up, clank!  You've got to be kidding me!  Now what?  The engine shifted rearward and banged into the firewall.  Thankfully, without enough force to do any damage.  Time to lift some more.  Pump the handle...Big Clank!  Now what???  Holy crap!  The transmission is free from the bellhousing and sitting on the transmission jack!

The feeling of relief was instant.  So all stop on lifting the engine time to get the transmission out from under the truck.  Since the truck wasn't lifted, we needed to lower the transmission off of the jack and down to the ground.  So we put down some cardboard and lowered the transmission to the ground.  Once out from under the truck, it looked like this:


The transmission is laying upside down in this pic.  Still you can clearly see the torque tube connection and universal joint.  Now on to the engine!

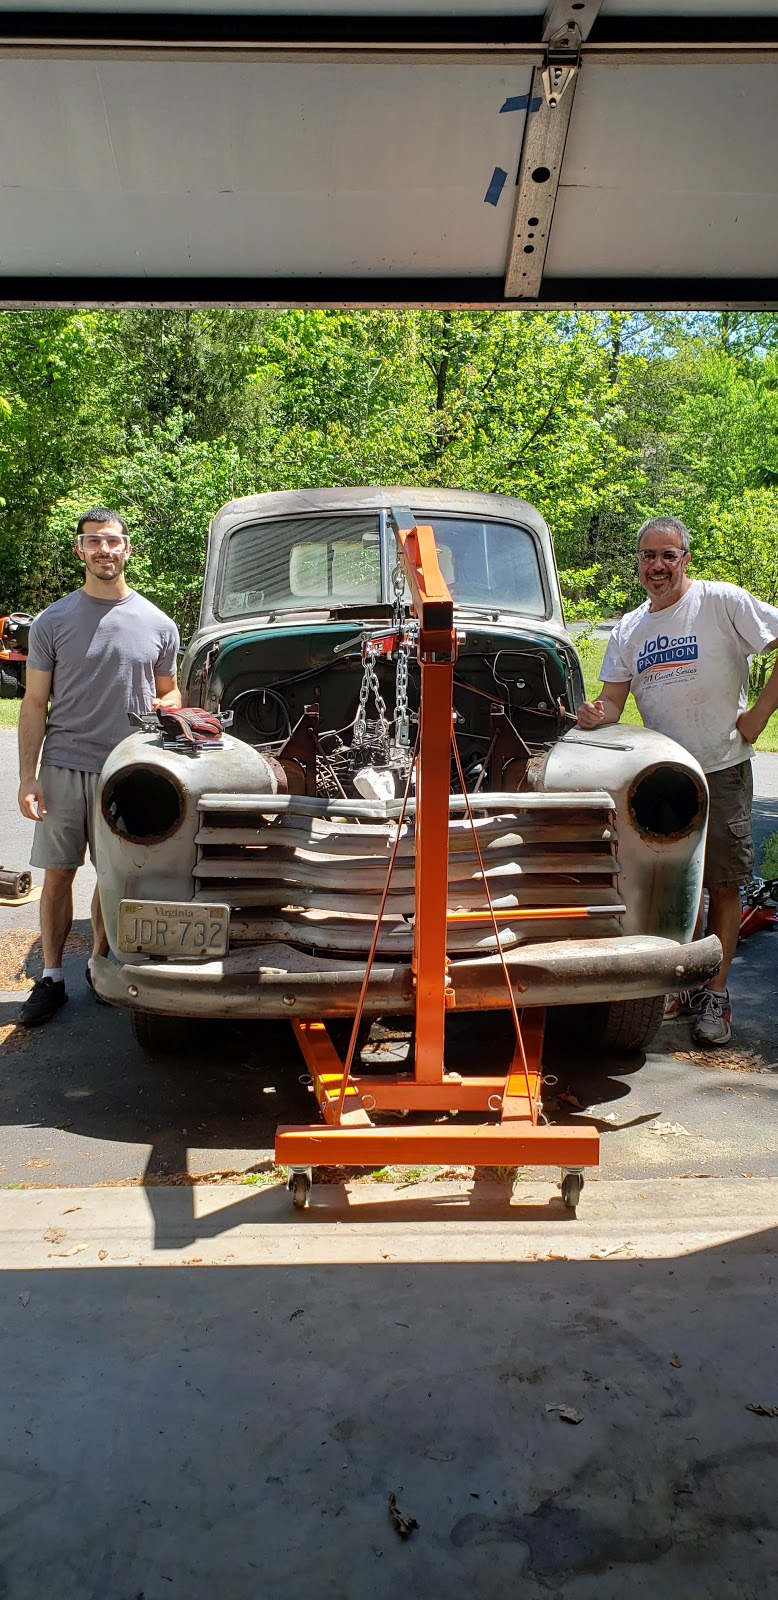
With the transmission out, it was time to really get that engine up in the air.  This was necessary for the engine to clear the truck's grill.  But before we did that, my wife snapped a quick pick of me and my helper, my youngest son.  We and the truck looked like this:


Time to get lifting!  Up, up, up it goes.  As you can see in the pic, we are close to the garage.  We are there, because we are pushing the truck wherever it goes!  So we only came out of the garage a little.  Decisions have consequences....  Once the engine hoist was raised to where the engine was just clearing the grill, it was about to hit the garage door opening!  OMG!  What to do?  We raised it literally as far as it would go and moved the hoist back towards the garage.  Using the load leveler we were able to drop the front of the engine after it had cleared the grill and raise the rear.  This was the most important part, as the oil pan is quite deep.  Once the oil pan cleared the grill we were in a pickle.  The engine, facing forward, could not be lowered as it would impact the front of the truck.  We couldn't move the hoist back, because the boom was against the garage.  Our solution was to rotate the engine so that it was sideways and to slowly lower it.  We wouldn't have enough clearance to get it to the ground, but lowering it would buy us some overhead clearance.  Once we had overhead clearance, we could move the hoist back a little, until it once again hit the overhead.  Lather, rinse, repeat.  Lower, move backward, lower, move backward.  Eventually, we got it down and into the garage.  Inside the garage me and the engine looked like this:


Under the engine you can see the dolly that I made using plans from the truck forum that I belong to.  Some finagling later and the engine was down on the dolly and stowed next to the engine that will eventually get installed in the truck.

Here is the transmission on the workbench:


As you can see, it is a mess!  And I wouldn't want it any other way.  Why?  Because under all that oily crud lies perfectly pristine cast iron.  The only rust is in areas that didn't get caked in oily crud.  A lot of cleaning?  Absolutely!  But seriously worth it.  I'll get the crud off and give it a nice coat of satin black paint.

The truck?  It now looks like this:


Kinda reminds me of when you lose your front teeth.  You look a bit goofy, but they grow back and then you look normal again.  In the meantime, I've got a ton of cleaning in the engine bay to do.  It is a mess!  Basically, I'm going to get a small stool and climb in the engine bay and have at it.  Once the transmission and engine bay are clean, I'll move on to prepping the replacement engine for installation.  Right now, the rear of that engine is set up for an automatic transmission and looks like this:


Instead of a bellhousing and flywheel, it had the automatic transmission, torque converter and flexplate.  These all have to go.  Remember that I have all of the parts necessary to make the conversion:


Restored bellhousing and stomp starter.

 New front motor mount, painted and ready to go.


Resurfaced, original heavy duty flywheel.

In addition to these, I've got a new clutch kit, new rear motor mounts, new radiator and all of the fluids and other bits and pieces necessary to make the installation.  But first, I'll fit out that engine with the parts to make it a manual transmission.

All in all it was a wonderful day.  I got to spend it with one of my children, working on my truck and making real progress.  It doesn't get any better than that.

Much more to come, Gray Ghost Fans.  Be sure to check back throughout the summer to see if I can make any progress!  That's all for now.